
I want to begin this sewing tutorial by saying I am not a professional sewer. In fact, if there is even a good sewer reading this blog entry right now, please don't judge me for my terrible ways. But this is how I do it. it may not get done right or in the prettiest fashion, but it gets done, stays together, and doesn't look too bad (if I do say so myself).
I have been trying to finish my bedding for quite some time. In the amount of time it has taken me to do anything, I could have had a masterpiece created, and yet, you will see, that it is no masterpiece. Just a simple pillow.


I have been trying to finish my bedding for quite some time. In the amount of time it has taken me to do anything, I could have had a masterpiece created, and yet, you will see, that it is no masterpiece. Just a simple pillow.
I used some leftover material from my footstool makeover and made myself a faux envelope pillow. Although I do want to add a button to it, I haven't yet found the perfect one. So, instead of putting the entire project off, I will just have to add on to it later.

I had a down pillow that I had bought at IKEA and have never had a cover on it that I have loved. As a reminder to all of you, I AM NOT A SEWING PROFESSIONAL and my ways are not necessarily the right ways, but they get the job done.

I laid the pillow on the fabric to kind of measure it and folded the fabric right sides together

and began sewing.

Here is one tip I learned from my home economics class that has stuck with me (that's kind of professional).
If you cut the excess fabric off around the corners of the pillow cover, the corners will be sharper and not round.

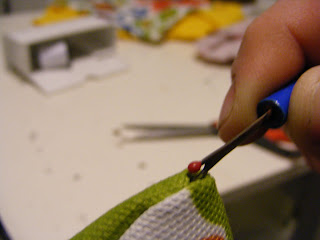
After sewing 3 sides only (need to keep one open to put the pillow in), I turned it inside out

and using my "picker" (I have no idea what the technical term is) to pull on the seams to make a more crisp edge.

And look, the corner theory I shared earlier, is indeed true.

I measured the pillow on the fabric again to see where I would sew the flap on and to make sure I didn't cut things too short.

Right now is a good time to cut off all tags from the pillow form. It's okay to do so despite the warnings. I hate having crunchy tags poking you when you are laying on a pillow.

On the piece of fabric you are going to use for the flap, turn and sew 3 sides so you have nice finished edges and you have no fraying strings or loose ends.

Sew the flap on the unfinished edge of your pillow cover. Make sure to have right sides together.
Shove the pillow in......

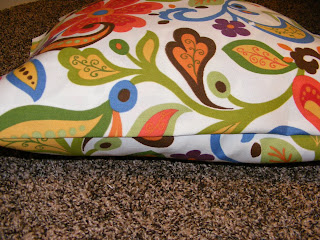
And hopefully, when you lay the flap over the top, the seam will align with the top of the pillow and all edges will be finished, the same size and ready to tack down.

Grab your needle and thread and hand sew a simple stitch over and over in one place to tack the flap down to the pillow. And this would be a great time to add your button if you have one. No need to make a button hole for it since this is a fake envelope pillow. Just sew it on the front to give the illusion of buttoning it together.

And there you have it. You're very own envelope pillow to match your foot stool (or whatever works in your room). Now, to finish my comforter cover. It comes in pieces and slowly along, but it does come along.

I LOVE that fabric and this tutorial came at a perfect time! I'm wanting to recover the pillows on my couches! You are Wonder Woman!
ReplyDelete