Showing posts with label Decor Knock-offs. Show all posts

A bathroom makeover

My new bathroom.....is pretty crazy.  But I have to admit that I am TOTALLY  in love with how it turned out.  I am not one who likes to do things simply.  When I do something, I want it to be bold and crazy.  I have always heard that your house decor should represent your personality.  That a person should be able to tell what kind of a person you are by the way your house is decorated.  For me, I have to agree.  This to me screams loud, crazy, daring and original- me to a T.
 
 
I started out with my cute black bathroom which I have had this way for years and have loved it.  I have loved the black......and the fact that no one else I knew had a black bathroom made me love it even more.

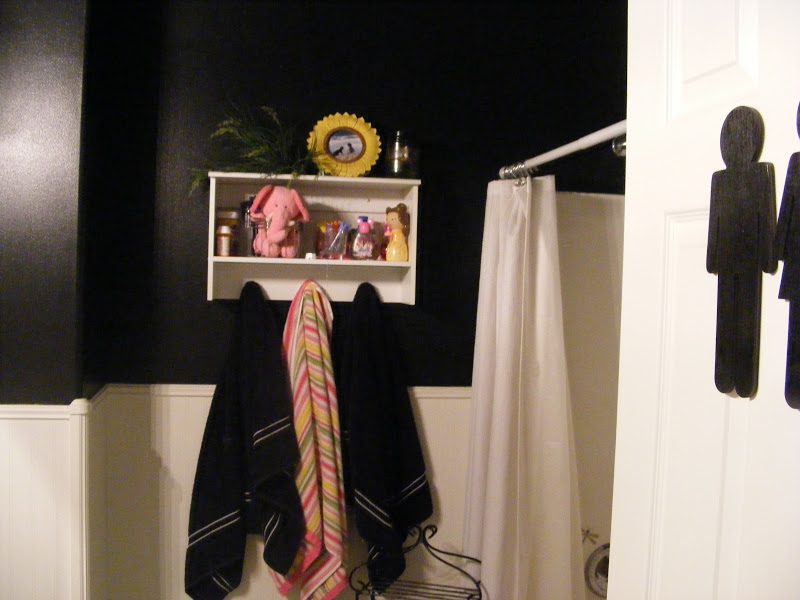

But as time goes by, the need for change rears it's head......and then the fun begins.

 
I knew I wanted to stick with my main color being black, and I new I wanted something super abstract.....so instantly I thought of a harlequin design.  I looked for wallpaper and couldn't find anything that met the expectations I had envisioned.  So, I had to do it myself. 
 
I went to the Home Depot and purchased a 6" by 6" tile to use as a template for my design. With the use of a level, I was able to sketch out a few diamond shapes

 
and then to make work a bit easier and quicker, used a ruler to continue drawing the lines.

 
After about 3 hours, I was able to sketch out the entire bathroom.  Now begins the longest part of the process.......the taping.

 
I decided to tape up and paint just one wall to make sure that it was what I wanted it to look like before I kept on with the grueling task at hand.  I painted it, took the tape off and found I didn't love it. My lines weren't super straight, and there was paint bleed from my not-so-good tape job. So, I took it upon myself to go to plan B.  Now don't judge me for this.  Just think of it as my creative, cheap mind trying to make it work.
 

I was at Hobby Lobby purchasing my Christmas wrapping paper for the season, and then I saw it and an idea was born.  The exact harlequin pattern I was looking for that I wanted on the wall.  Now I realize wrapping paper and wallpaper are totally different things, but I thought "why not".  And for $7 for a roll of wrapping paper I loved, vs. $82 for a roll of wallpaper I just kind of liked, there was no question in my mind.   Now this particular wrapping paper was a bit heavier duty than most.  So I bought myself 3 rolls and headed to the aisle where I could find super strength spray adhesive, made my purchases and headed home.  


I sprayed the wall with the adhesive and followed the instructions carefully on the can.  I then cut my wrapping paper and hung it on the wall, until the whole room was covered.  I tried super careful to match up the pattern so it would look as seamless as possible.  To finish it all off, instead of using modge-podge which I used on a similar project before in my master bathroom, I used a polyurethane and lightly painted it over the paper to make it a bit more waterproof.  I don't know if I would recommend this in an area where the walls would be getting wet a lot, but because the majority of my room is covered in a bead board, I felt the paper would be a safe choice. 
 
So that's it.  And with the help of one of the best home consignment stores ever, Consign & Design furniture and home decor in Farmington, Utah, I found a darling mirror and cute rod iron stand that added the fun little touches to this room that I was looking for.

 
As crazy as this may look and sound to most of you out there, I feel like I got what I wanted, spent a total of $65 on the entire project and made it work for me.  It just took a little thinking outside of the box, and a little bit of an adventurous spirit.  

 
But isn't that what being crafty is all about.


Fancy Glassware

Sometimes it's fun to drink from a fancy glass, am I right? And although I may not fill these glasses with wine or champagne, when I drink Diet Pepsi (my beverage of choice) I like to be/feel fancy too.

I was at Ross the other day and found this cute black and white sparkly glass.  I had to buy it.  Upon closer look at it, I was so happy to find out that it was made of nothing more than rhinestone stickers attached to a plain old wine glass.  How easy to replicate!!!! 


So replicate I did.  I found some super cheap wine glasses and then headed to Michael's Crafts to find some stickers.  Lucky for me, they came in strips and all I had to do was make one easy peel and stick it on the glass. 


Although they are not dishwasher safe......it's worth a bit of a hand wash to have a glass that makes yo feel super fancy, no matter what beverage you chose to put in it!


An outdoor towel rack

We love to swim and stay wet all summer long.  The problem is that I don't do laundry every day all day all summer long and I have no deck or railing to hang our damp towels over to dry out.  So, I came up with another idea.  A pretty clever one I think.  I made an outdoor towel rack that can sit on our back patio and help dry our towels out until they are ready to be used again. 


I apologize for these awful pictures.  I was making these in the heat of the afternoon so was trying to find refuge in the shade of my garage.  As a result, the pictures are half shaded and half sunny.  Try to overlook my photography errors.  Oh and don't mind the dead grass in the background of the above picture.  We have worked out our sprinkler issues and the problem is being resolved.

I went to my favorite store ever, Home Depot, and bought 2 3' square dowels and 1 5' round dowel. 


In one of the square dowels, I drilled 2 holes on opposite sides of the square dowel, just big enough that the round dowels could fit through.  Hopefully the picture clarifies that above statement. 


And then I cut my long 5' dowel in half and inserted them into the holes of the square dowel that I had just drilled.  Stuck in a little wood glue to hold them steady and level, and that part is done.


Now to the bottom.  I notched out 2 pieces of wood and screwed the whole thing together.  


Somehow I feel like it needs a little something more to finish it, but for now it will do and we will put it to good use this summer for sure. 

A different style of frame


Like so many of us out there in the world, we are proud to display pictures of our pride and joy......our families!  I have found so many pictures of my family that I want hung, but I am kind of getting tired of the same old style and shape of frame.

I love to boutique shop and shop for homemade treasures, and it is becoming a more frequent sighting of these darling scrolled and cut picture frames.  However, the rule of thumb with this kind of work is, the more scrolls and cuts it has, the more it costs.  You know it's true.  And if you've figured anything out about me after reading some of this blog, you know that I am pretty darn thrifty and if I can find a way to make it myself, I will.  And after seeing a price tag of $45 on an 8X10 frame, that's just what I did, made it myself.

I did not make this frame.  It's similar to the one's I had been seeing
and after seeing one on a website actually hanging on a wall,
I knew I needed one too.

My cousin (who is a much better free-hand artist than myself) drew out a stencil for me.  He did it large as I wanted the opening to be 11x14 for a family photo to hang in. So he drew one that size, and I took it to the copy store and had it laminated and shrunk into different sizes so if I wanted an 8x10 instead, my cousin didn't have to draw another one.  I then headed to the Home Depot where I bought me a nice large piece of wood that cost me $10.59.


I laid the drawing onto my board and traced it.


Then, with my favorite saw, the scroll saw, I began to follow the pattern and cut it out.  Because there were so many turns to make and because I broke a few too many saw blades, it took me about an hour to cut out this one frame.  I am sure, now that I know what I am doing, the next one will be a breeze. But, nonetheless it was cut out, sanded, and with the use of a router, I had a nice finished edge to the frame.

My frame here is not sanded down yet. You'd be surprised at how many flaws
can be removed with a little sandpaper.


Then came the hard part, cutting the straight lines on the inside of the frame.  With a lot of patience, it got done and it was ready to paint.  And here, is the finished product....


I was so proud of how this turned out, I tried it with one more pattern, and here is the result of that....


So there ya go.  For a little less than $30, I had myself 2 11x14 custom made frames that, had I chose to buy at a boutique, would have cost me closer to $300.

It goes to show that if you are willing to put in a little work, and have the tools (or if your neighbor has the tools) and the patience, you too can find yourself bragging about being super crafty!

Now, to get the pictures taken to put inside the frames........hmmmm!


Mercury Glass DIY

Check out what I just found and had to give it a try.  You all know that mercury glass is making quite a "splash" in decor these days.  But holy cow, is it ever pricy.  When I saw this paint and realized I could make it myself for 1/3 of the price, I was tickled.

After gathering some small glass jars at a garage sale this weekend I set to work at my first attempt at faux mercury glass.  I liked that it didn't require any fancy gold leafing or extra paint, just the Looking Glass spray and some vinegar and water.
Here's the how to..........
  1. Gather the glass jars.
  2. Start spraying the Looking Glass paint onto the inside of the glass. (I held the glass in my hand so they were laying on their sides and applied the paint in quick bursts, then rotated the glass to get the next area. They key is to be very light in your application).
  3. Let the jars rest for about a minute then repeat step 2. The instructions call for 5 applications with 1 minute drying time in between each.
  4. Start distressing. Make a mixture of 50% vinegar and 50% water and put into a spray bottle. After letting the paint dry for 5-10 minutes, spray the vinegar-water solution lightly into the inside of the jars just to cover the surface with little beads.
  5. Let the beads of vinegar-water sit for 20 seconds or so.
  6. Take a paper napkin, fold it up and dampen it with the vinegar-water solution. Then, gently dab (up and down) the beads of vinegar. At this point the vinegar should start to eat away at the paint.
  7. Gently rub the damp napkin in circles to widen the distressed areas and start sloughing off more of the paint. Use your judgement to achieve your 'ideal' look.
  8. Finish with one or two very light coats of the Looking Glass spray paint to add a bit of dimension to the spots that had no paint.
  9. Place tea light candles inside the jars and light!
My big tip: Wear a latex glove or two. While the fancy silver and green manicure I am still sporting is super cool, you will thank me later if you just put on a glove.
And here is my result!!

 I have many more to spray and I can't wait to get them outside to use for a patio party.

Rustic Sunburst Mirror

I love sunburst mirrors.  But, I wanted one that was a little different than the metal kind you find in stores like pier 1 and z gallery.  So, I tried to make my own version using a really cool bunch of sticks I bought at IKEA ages ago.  Here's where my crazy ideas took me......


I bought a little mirror at Tai Pan for $2.  I am not sure I love the symbol in the center of it,  but it will do for now.  And then you can either gather your own sticks, or cheat like me and visit IKEA.


I decided on a length I thought would look good with the mirror and with my favorite tool....the glue gun....I began gluing the sticks to the back of the mirror.


And you just keep gluing until your sunburst is as full as you want it. 


I put a string on the back of the mirror between the two hooks and hung it up on my wall. 
I love it. 
It's exactly what I was wanting for my bedroom.
Pretty crafty don't ya think?

Faux Envelope Pillow

I want to begin this sewing tutorial by saying I am not a professional sewer.  In fact, if there is even a good sewer reading this blog entry right now, please don't judge me for my terrible ways.  But this is how I do it. it may not get done right or in the prettiest fashion, but it gets done, stays together, and doesn't look too bad (if I do say so myself).


I have been trying to finish my bedding for quite some time. In the amount of time it has taken me to do anything, I could have had a masterpiece created, and yet, you will see, that it is no masterpiece.  Just a simple pillow. 

I used some leftover material from my footstool makeover and made myself a faux envelope pillow. Although I do want to add a button to it, I haven't yet found the perfect one.  So, instead of putting the entire project off, I will just have to add on to it later.


I had a down pillow that I had bought at IKEA and have never had a cover on it that I have loved.  As a reminder to all of you, I AM NOT A SEWING PROFESSIONAL and my ways are not necessarily the right ways, but they get the job done. 


I laid the pillow on the fabric to kind of measure it and folded the fabric right sides together 


and began sewing.


Here is one tip I learned from my home economics class that has stuck with me (that's kind of professional).
If you cut the excess fabric off around the corners of the pillow cover, the corners will be sharper and not round.


After sewing 3 sides only (need to keep one open to put the pillow in), I turned it inside out


and using my "picker" (I have no idea what the technical term is) to pull on the seams to make a more crisp edge.


And look, the corner theory I shared earlier, is indeed true.


I measured the pillow on the fabric again to see where I would sew the flap on and to make sure I didn't cut things too short.


Right now is a good time to cut off all tags from the pillow form.  It's okay to do so despite the warnings.  I hate having crunchy tags poking you when you are laying on a pillow.


On the piece of fabric you are going to use for the flap, turn and sew 3 sides so you have nice finished edges and you have no fraying strings or loose ends.


Sew the flap on the unfinished edge of your pillow cover.  Make sure to have right sides together.
Shove the pillow in......


And hopefully, when you lay the flap over the top, the seam will align with the top of the pillow and all edges will be finished, the same size and ready to tack down.


Grab your needle and thread and hand sew a simple stitch over and over in one place to tack the flap down to the pillow. And this would be a great time to add your button if you have one.  No need to make a button hole for it since this is a fake envelope pillow.  Just sew it on the front to give the illusion of buttoning it together.


And there you have it.  You're very own envelope pillow to match your foot stool (or whatever works in your  room).  Now, to finish my comforter cover.  It comes in pieces and slowly along, but it does come along.

Silly Faces

My kids love those books that have magnetic faces with a variety of cutouts to choose from to create silly faces.  But the book, unfortunately, is at Grandma's and isn't always there when they want to play with it.  So, I thought about it, and found a way to bring some fun home. 

I took pictures of my kids and put them in some frames I had that were being unused.  (I am convinced I will always find a need for things so I never throw things aways.  It's a character flaw.)


I purchased some sheet metal that was already the size I needed.


Went home and googled a bunch of silly images I could use and sized them to fit my kids faces.  You can do this in the silhouette studio program, or I just used photoshop.


Then I modge-podged everything to magnets and the kid's pictures to the piece of metal.  Took the glass out of the frame so that the magnetic pieces would stick right to the picture.........and here's what we got.


My kids love it SOOOOOO much! Now they can make themselves look silly whenever they want.

 Now, isn't that crafty!