Showing posts with label home decor. Show all posts

Another room remodeled

So this remodel project is what has taken me away from blogging and other various activites for the last little while.  I decided I had to change the paint color of my basement family room to a color that was a little more me.  For years I have seen my friend's cute house and it was painted this beautiful yellow color that I was absolutely in love with.  I got the name of the color and instantly bought 5 gallons to paint our newly finished basement familiy room.  I got it on my walls, and new right away that I didn't love it.  I tried to decorate differently, add accent walls,  you name it I did it.  But I could not get over how much I hated the color on MY walls.  I got to dislike it so much, that I didn't even enjoy going down there anymore unless we were going to watch a movie and the lights were off so I didn't have to look at it. I hve learned through this ordeal, that things you like in other's houses, will not always look good in your house.  I still love her house color, but it is just not me and it is certainly not the color for my house.
 
 
So, after the holidays, I decided to change the color to something I liked more.  My upstairs main rooms were painted a beautiful Camino Gray (Ralph Lauren color) and I loved how calm they made me feel and how neutral they were to decorate with.  So, I took that color downstairs as well.  And then combined it with what I like to think is my signature color, Fire Engine Red!!  I want to share a few tips with you about buying gray paint.  There are a million different grays out there and I have learned (the hard way) that you have to be careful how you choose the perfect gray. 
 
Gray paint has three different base tints. You can get it with a base color of purple, blue and green.  The purple and blue may look pretty together, but once you get them on the wall and the walls start reflecting off each other, you will see that they will look lavendar.  But, gray with a green base tends to give you a true gray color. Just FYI.
 
 
I decided to make a focal wall as a faux board and batten square pattern. I did that in my little boy's room and you can find that tutorial here.

 
I then found some great fabric at a local home fabirc store who sells fabric at wholesale prices.  It took 10yds to do make 4 - 84" panels.  I paid $40 total for the fabric.  I feel like I practically stole it!! The window cornices were featured in a tutorial way back when and you can find that here if you like that look.

 
And then those super cute frames, I made them.  I have no tutorial on them as it took me forever to get from start to finsih becasue lately I have a serious problem with starting 5 or 6 projects and finishing 0 of them.  Because of that, I have no insructions for how I made them, but I did find instructions here, so you can make your own.

 
And I did another faux board and batten square pattern at the end of the hallway.  One day I will get around to hanging some really cool and colorful pictures but again....I have become the crafter who doesn't know how to finish a job. So that will have to be for another day.
 
All in all.....I think the room turned out amazing!!! And it was a remodel that with a little time and effort, cost very little to do.
 
 
It's all about being a litte daring.....and a little crafty.


Command Center

It's always nice to have one central place to run a home and your lives smoothly.  Until now, we have had no reason to really need one other than a personal calendar to remind myself of crazy work schedules.  But now with kids in school (year round school with crazy breaks and holidays), piano and tumbling lessons, soccer and birthday parties, we can no longer get ourselves by with just a little pocketbook calendar.  And I am NO good at all this electronic updating and such.  So, I was inspired to create our very own "command" center where my husband and I could stay up to the minute with the crazy thing we call LIFE. 


I took a wall in my kitchen (the only available wall really) and posted important things on it.  My kid's school schedule so we are aware of when we are on break and when we need to go back. 


A to do list so that I can solicit help from others once in a while....and a great idea from a fantastic friend of mine, a shout out to Launie, a menu.  This way we can write down our planned out meals for the week and shop accordingly. Hopefully this will prevent fruit and veggie rot and help with budgeting too.  We just update weekly or as needed using a dry erase marker.  When we have accomplished our task, simply grab a paper towel and wipe it off.


After living with this for 7 days now, I can see an improvement in how things function around here.  No more rescheduling, forgetting or guessing.


And that provides me with a little more time for enjoying!


Enshrined toys

I was recently cleaning out our toy closet and came across these little matchbox cars.  My little guy LOVES cars and we have become the proud owners of probably close to 50 or more matchbox cars.  So, I decided to take a few of them and use them as decor in his "Route 66" themed room. 

I went to Hobby Lobby which is craft heaven for those of you who have never been, and I bought these cute 5X7 shadow boxes for $2.99 each.


I painted the back of them black....you could use any color, and then I decided to just keep the light oak color on the outside frame.


I hot glued the cars in the box and put the frame together.  Simple as that.  And now I have a cute decoration of HIS toys to remind me later of what kinds of things he liked to play with.


Isn't that crafty!

Sprucing up the table

I found this cute napkin holder while on an outing to IKEA a few days ago.  For $1.50, I thought it was a steal even though it looked kind of blah to me.  But I knew that my obsession with glitter was about to pay off and I suddenly had plans for this little treasure.


I mixed some craft glue with a little bit of water so it would be easier to spread on the metal star. 


and then I added gobs of glitter. 


Now, this blah napkin holder has turned into something that is sure to spruce up any table, for any occasion. 
Happy Crafting!


Think Green

It's been heaven having my hand free of that itchy fiber glass cast.  And since I've had it off, I have taken full advantage of the increased mobility.

I got right to work with my saws and began my frequent visits to the local Home Depot.  I'm sure I was missed there as I do contribute quite nicely to their sales.  Well, I'm back.  I grabbed some wood determined to make some St. Patrick's day decor to put around the house for the month of March.  I had seen a cute hat similar to the one pictured below and figured that would be cute and different.  Something unique.


So I found a pattern on the Internet, traced it onto the wood, and with my scroll saw cut it out. 


I used this fantastic color of green.  It's called "limeade" and I love that it's not the traditional Shamrock or Kelly green, but it's got such a nice springy color to it.  


So I painted the hat and added some cute patterned paper to it just to give it more character.  I just painted Elmer's glue on the back of the paper and stuck it on the hat. 


Once it was on and dry, I cut the excess paper off.  I am not great at measuring.  In fact, I am terrible at it.  But not to worry, no one has to know.  If you have paper hanging over the edge of wood and it's too difficult to cut with scissors or an Exacto knife, grab a wood file or a piece of fine sandpaper and sand those edges right off.


I added a little ribbon, some glitter (of course) and a vinyl saying "Kiss me" and there you have it....


My little bit of luck. 


Oh, and I found these cute letters at a local craft store and decided they were fun for the holiday too.  I know, "kiss me" is more of a Valentine's day saying, but there's a little bit of Irish in all of us, and as the saying goes "kiss me I'm Irish."  Besides, it doesn't hurt to have a reminder for your beloved to see.  Am I right?


A different style of frame


Like so many of us out there in the world, we are proud to display pictures of our pride and joy......our families!  I have found so many pictures of my family that I want hung, but I am kind of getting tired of the same old style and shape of frame.

I love to boutique shop and shop for homemade treasures, and it is becoming a more frequent sighting of these darling scrolled and cut picture frames.  However, the rule of thumb with this kind of work is, the more scrolls and cuts it has, the more it costs.  You know it's true.  And if you've figured anything out about me after reading some of this blog, you know that I am pretty darn thrifty and if I can find a way to make it myself, I will.  And after seeing a price tag of $45 on an 8X10 frame, that's just what I did, made it myself.

I did not make this frame.  It's similar to the one's I had been seeing
and after seeing one on a website actually hanging on a wall,
I knew I needed one too.

My cousin (who is a much better free-hand artist than myself) drew out a stencil for me.  He did it large as I wanted the opening to be 11x14 for a family photo to hang in. So he drew one that size, and I took it to the copy store and had it laminated and shrunk into different sizes so if I wanted an 8x10 instead, my cousin didn't have to draw another one.  I then headed to the Home Depot where I bought me a nice large piece of wood that cost me $10.59.


I laid the drawing onto my board and traced it.


Then, with my favorite saw, the scroll saw, I began to follow the pattern and cut it out.  Because there were so many turns to make and because I broke a few too many saw blades, it took me about an hour to cut out this one frame.  I am sure, now that I know what I am doing, the next one will be a breeze. But, nonetheless it was cut out, sanded, and with the use of a router, I had a nice finished edge to the frame.

My frame here is not sanded down yet. You'd be surprised at how many flaws
can be removed with a little sandpaper.


Then came the hard part, cutting the straight lines on the inside of the frame.  With a lot of patience, it got done and it was ready to paint.  And here, is the finished product....


I was so proud of how this turned out, I tried it with one more pattern, and here is the result of that....


So there ya go.  For a little less than $30, I had myself 2 11x14 custom made frames that, had I chose to buy at a boutique, would have cost me closer to $300.

It goes to show that if you are willing to put in a little work, and have the tools (or if your neighbor has the tools) and the patience, you too can find yourself bragging about being super crafty!

Now, to get the pictures taken to put inside the frames........hmmmm!


Holiday in the Window

First of all, don't judge me because my photography skills are terrible.  Perhaps that would be a wise resolution to add to the 2012 list of "Things to Learn" but for now, it is what it is.  As I mentioned in my previous crafting entry, I am still trying to figure out ways to decorate my basement for the holidays while still allowing it to be kid friendly, since it is where the kids are sent to spend the majority of their time.  For me, the solution, aside from the Christmas tree, is to hang things wherever possible.  First a wreath on my mirror, and now candy canes from the wooden valances above my windows.


I found these plastic candy canes (6 to a bag) at Dollar Tree and bought some festive ribbon to accessorize the hanging. 


With the use of a little hot glue, I adhered the ribbon to the candy cane


Using some tape, I hung the candy canes from the backside of the valances, making them hang as evenly as possible


And when they were finished, I was pleased with the outcome of my work.  All 10 minutes of it.


There ya go.  Another easy way to add holiday cheer to any room without taking up space.

Now isn't that crafty!

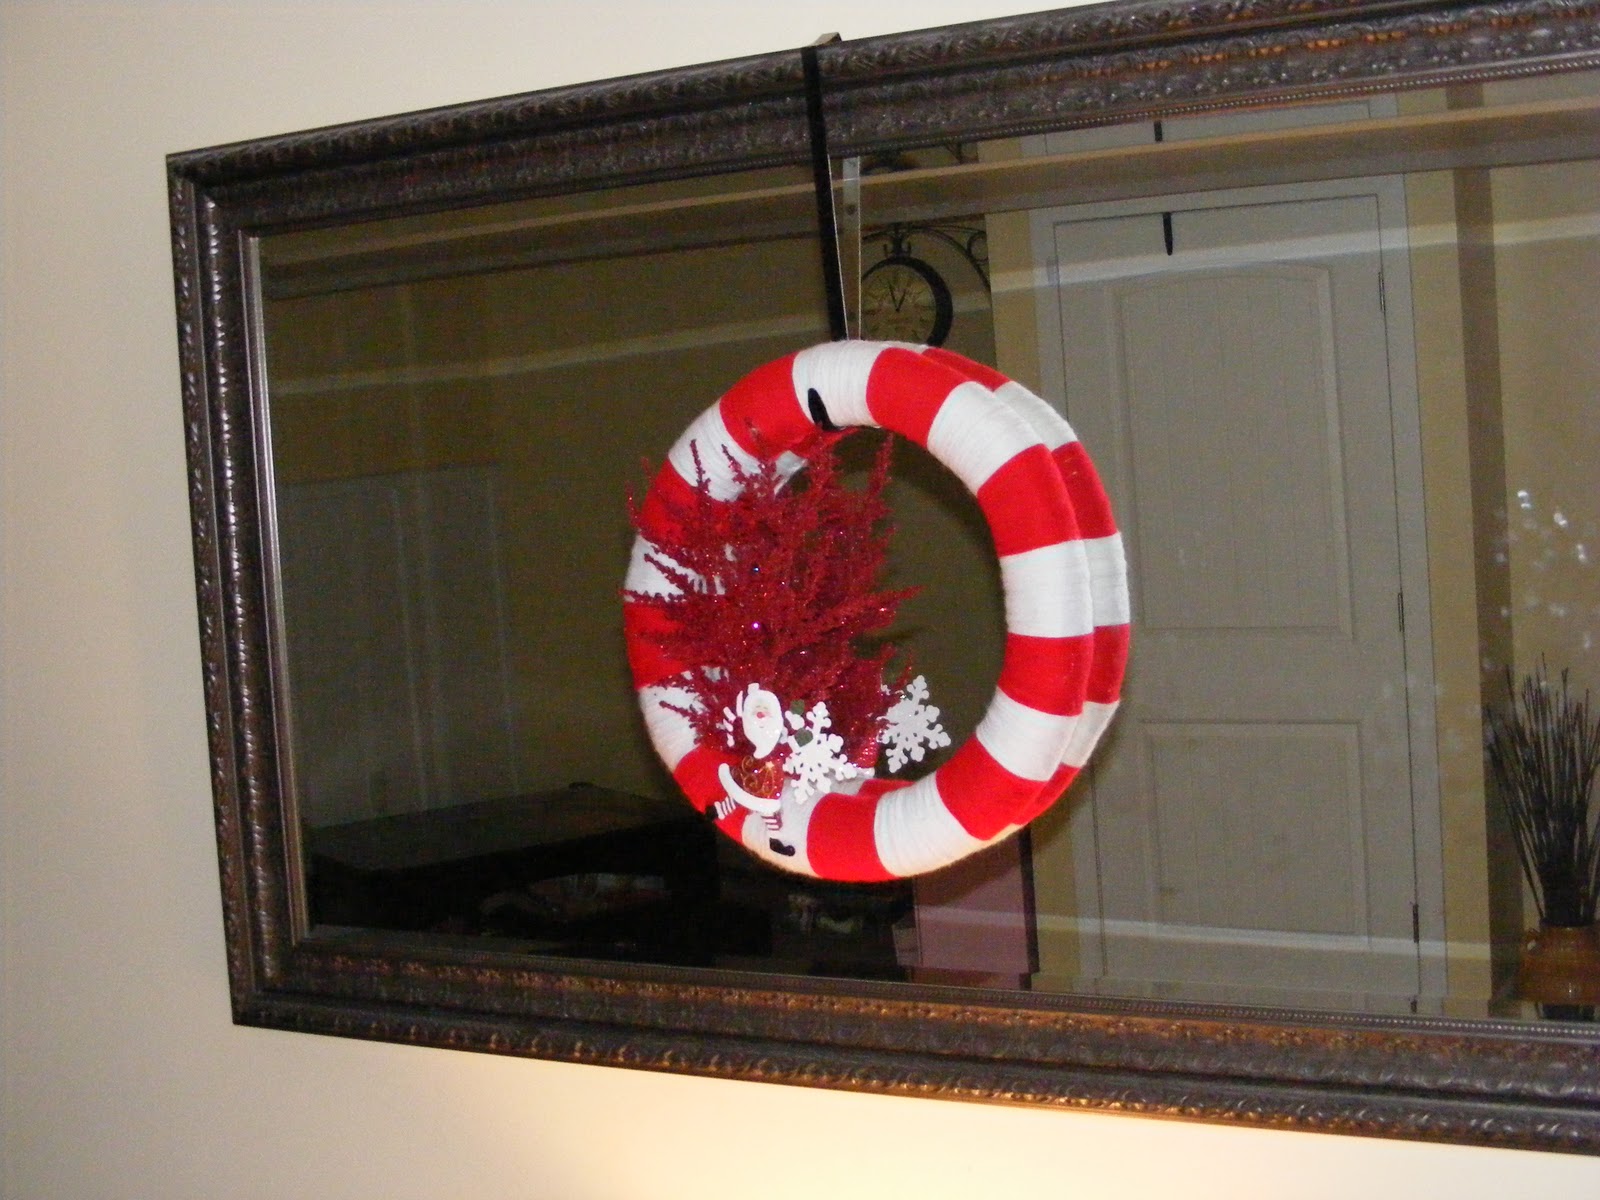
A candy cane wreath

This is one of the first Christmas Holidays that we have had the opportunity to decorate our fairly newly finished basement.  I looked through all my stuff and found I was low on decorations, so I had to put my hands to work making something new.  We put up a Christmas Tree on one end of the room, and on the other, decorated the fireplace. 


And since this room is referred to as the "kid's domain" it was hard to figure out what else to put in there that wouldn't get destroyed before we actually had a chance to enjoy it.  So, the only option I was left with was something that could be hung and out of the line of fire.
c
I love the color RED and am so happy to use it as much as possible.  I also love candy canes (probably 'cause they are red and white) and will use them anywhere I can.  So, with candy canes and red in mind, along with the "hanging" I made a wreath that is different, yet quite cute.  -Well, at least I thought so.


I took a wreath form that I bought at Michael's Crafts and with red and whit yarn, began to wrap it in color blocks as to look striped.


There was no gluing involved.  I know I can't believe it either, especially with the way I love a glue gun. Instead, when it was time to change the color, I just tied the two strings together in a knot on the back of the wreath, and trimmed the extra string.


and continued to wrap and wrap the yarn around.  To pass the time, as it requires little concentration, me and the kids watched Home Alone 2 and sipped hot cocoa. 


Before the show even ended, the wreath was finished.  Well, almost.  It still needed a bit of embellishment.


I found an unused sparkling Santa and some cute sparkly picks and I have to admit, I did use hot glue to adhere them to the wreath. I almost got away with a whole craft without the use of hot glue. 


And then, I hung it with care on the big mirror that adorns the wall in the room.  It added to the holiday spirit of the room, and inspired me to do something else...............


Stay tuned for what idea was born next!


Decorative Ladder

I have a space in my room which needed  little something extra.  After thinking and thinking about it, this is what I came up with. A faux ladder hung on the wall and on the ladder, the moss covered B that I made a little while ago.


To make the ladder, I cut up some 1" x 2" boards to make the rails and rungs.  It really wasn't to hard.  I added some wood glue to the ends of the rungs and then nailed them to the rails.


Then to make the piece look seamless, I spackled all holes and seams with putty and then sanded it all off.


Paint it up and hang it up.  You could hang a cute wreath off of this or anything creative you can come up with.


VOILA!!

Twigs and Things


While collecting small twigs and things to use as kindling for my upcoming girl's camp, an idea was born.  Inspired to bring nature indoors, I took some of the "best" looking twigs inside, sanded them lightly to create a worn look and broke them into smaller pieces.  This is what I came up with.


Sometimes I wonder if certain things are best left outside.  But, I am amazing at rationalizing anything.  Besides, don't you agree that nature, in any form, is beautiful.